Which Propeller to Use?
One potentially daunting task when starting a project with the Propeller is deciding which Propeller board to use. When using the Propeller for research, we are generally interested in 5 features:
- The Propeller chip
- A way to power the Propeller
- A way to program the Propeller
- A way to connect the Propeller to devices
- A μSD card socket for saving data
Although every project has slightly different requirements, these basic points are useful to consider. On this page I will discuss several Propeller boards in terms of these requirements and ease of use. I cannot cover every Propeller board, but I can discuss the most common boards. Of course, my favorite board is currently the Propeller Platform, to which I dedicated another webpage.
The Propeller Chip

The simplest option is to purchase a Propeller chip and create your own circuit board to house the chip and connect to the apparatus. The Propeller chip is available in surface-mount and DIP forms. With the right set of skills you can create circuits on a breadboard, hand solder circuits on a protoboard, or even create printed circuit boards for your projects. This method is great for individuals. that are primarily interested in electronics, but not as useful for individuals that want to start an experiment as soon as possible. Although creating your own circuitry for a Propeller chip is always an option, I do not recommend it for beginners. I also think there are more efficient options even for those with the requisite skills, as even skilled users will need to spend the time creating circuitry to power and program the propeller as well as create connections to an apparatus an A μSD card socket. However, if you are interested in learning more about the electronics, Parallax carries a nice education kit for creating your own circuits and a development board for creating your own circuits with useful built-in peripherals.
Propeller Quickstart

The Quickstart is on of Parallax's evaluation boards. It is designed to make developing new projects extremely easy. The Quickstart can be powered by a computer through the SUB programming cable, provides access to all of the Propeller's 32 I/O pins through a convenient pin header, and even has 8 built-in LEDs and 8 built-in touch pads that can be used in finalized programs or in testing and development.
The Quickstart's pin header is extremely useful for development. You can use jumper wires to connect the pin header to a breadboard, or an apparatus. You can also use a protoboard the create a "shield" that can be plugged into the Quickstart. Each shield can be specialized for a different task. You can also plug the Quickstart directly into your apparatus through the pin header.
I particularly like the LEDs and touch pads. These can be a great way to learn how to program with the Propeller before worrying about attaching it to a device. The LEDs and touch pads are also set up in such a way that they are extremely unlikely to interfere with other devices connected to the same I/O pins. It is important to note that the touch pads are not the same as switches and thus require a slightly different programming approach to use. For this reason, I added some code to the Propeller Experiment Controller software package for using the touchpads. See Experimental_Event's DeclareQuickStart, DetectQuickStart, and AdjustQuickStartSensitivity methods. Although they are very useful in designing programs, I typically do not like to use the touchpads for control in experiments as they lack the tactile feedback of a button and are a little sensitive to skin humidity and ambient humidity.
If you purchase a Quickstart, I also highly recommend purchasing a Quickstart Pin Finder. The pin finder makes it much easier to identify pins than constantly referring to the manual or counting from the 4 pins numbered on the Quickstart circuit board.
The Quickstart does have a few drawbacks. Although it can be powered by a computer during programming, it cannot be powered from a USB power supply. The Quickstart only takes power from USB if it knows there is a computer on the other side of the connection. This can be fixed by adding in a single connection. Revision B already has this connection made in the circuit board. The Quickstart also lacks a barrel jack or screw terminal connection for a power supply. To power the Quickstart, you will need to connect a power supply to the pin headers, which can be a little intimidating to beginners. It is completely possible to make the wrong connection and destroy the Propeller chip. The Quickstart also possesses a 3.3 volt regulator, but not a 5 volt regulator. This is a relatively minor concern, but a 5 volt regulator is often useful when powering devices that need exactly 5 volts such as other integrated circuits and sensors. Finally, the Quickstart does not have a μSD card socket to save data. If you want to save data, you will have to add a μSD card socket. Fortunately, the Quickstart's pin header allows you to easily attach other boards that can contain a μSD card socket.
One way to connect a μSD card socket is to solder a μSD card socket onto a protoboard. I demonstrate this in one of my video tutorials. In this tutorial I also demonstrate how to solder a connection to allow the Quickstart to receive power form any USB charger making it easy to power when away from a computer. The protoboard can be connected in several ways; I connected it with the Quickstart on top to keep access to the LEDs and touchpad. Although this method is definitely effective at providing a μSD card socket, it does require some soldering skills. If you are new to soldering circuits, make sure to do some research first. Once the μSD card socket is installed, you have a very nice Propeller board and you even have extra space on the protoboard for other specialized equipment or connections to your apparatus.
Propeller Activity Board

The Propeller Activity Board is a flexible board with several peripherals that is useful for education. It can be powered by USB or through a barrel jack. It also provides connections to 16 of the Propeller's I/O pins through a pin header. It also has the much needed a μSD card socket in addition to stereo audio output, an connection to add a Xbee for wireless communication, several connections designed for servos, a digital to analog converter (2 channels), an analog to digital converter (4 channels), a built-in bread board for prototyping, and both 3.3 volt and 5 volt regulators. Although it is aimed more for education, the Propeller Activity Board it is a very capable board for a very reasonable price. The only drawback of this board is that it does not provided access to all 32 I/O pins. If you do not need access to every pin it makes a great experiment controller.
Propeller Board of Education

The Propeller Board of Education is similar to the Propeller Activity Board in form but has even more features. Like the Propeller Activity Board, it is aimed toward education but provides many features that make it useful for an experiment controller. The Propeller Activity Board can be powered by USB, a barrel jack power supply, or by a 9 volt battery. It provides a μSD card socket, VGA video output, stereo audio output, a built-in electret microphone, a connection to add an Xbee for wireless communication, several connections designed for servos, a digital to analog converter (2 channels), an analog to digital converter (4 channels), a built-in bread board for prototyping, pads for surface mount soldering on the bottom of the board, and both 3.3 volt and 5 volt regulators. Although it is a little more expensive than the Propeller Activity Board, it also has great potential as an experiment controller. Again, my only concern is that not all 32 I/O pins are accessible.

Small Propeller Boards
There are currently two small propeller boards, the Propeller Mini (top) and the Propeller FLiP (bottom). I am discussing both boards here as they are so similar. Both boards are extremely small and have no peripherals. To use these boards as experiment controllers you will need to attach them to an additional circuit board that connects to your apparatus, power supply and μSD card socket. The benefit of using these tiny boards instead of building your own circuitry with a Propeller chip is that these boards already include basic circuitry (voltage regulators, EEPROM, crystal, etc.) and simplify access to the I/O pins.
There are a few distinctions between the Propeller Mini and the Propeller FLiP. First, Propeller Mini only provides access to 19 I/O pins, while the Propeller FLiP provides access to all 32 I/O pins. Although I like the design of the Propeller Mini, limited access to I/O pins is very disappointing to me. Second, the Propeller Mini has both a 3.3-volt and 5-volt regulator, while the Propeller FLiP only has a 3.3-volt regulator. Third, the Propeller Mini does not have the circuitry to be programmed directly from a USB cable. Instead you must use a Prop Plug to program the Propeller Mini. The Propeller FLiP can be programmed directly through a USB cable. Although this may seem like a weakness of the Propeller Mini, I see it as a potential strength. The circuitry required to communicate with USB uses power. By removing this circuitry and instead using a Prop Plug, the Propeller Mini can be more efficient with battery power.
Both the Propeller Mini and the Propeller FLiP are useful in small spaces, especially in portable devices where battery power can be an issue. Although you do not have full control over the circuitry as you do when building a circuit for the Propeller chip yourself, having the necessary components built-in to the board can be extremely useful. However, since so many other things are required for an experiment controller, I would not recommend these for beginners. Instead, the Propeller Mini and Propeller FLiP should be considered for special where small size and battery conservation might be useful.
Propeller Platform
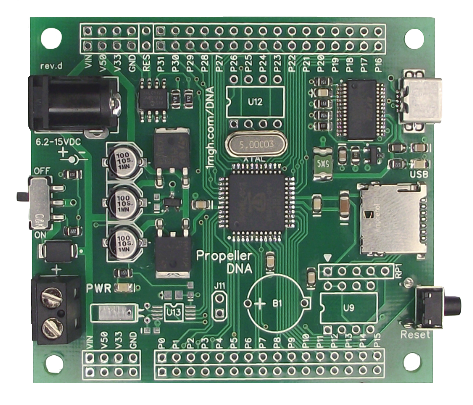
My favorite board is the Propeller Platform. I recommend this board for new and experienced users alike. You can see a detailed page on the Propeller Platform here.
The Propeller Platform is a third-party development board. It has been developed, refined and produced by various members of the Propeller community. Currently you can purchase the Propeller Platform DNA and the Propeller Platform Express. The Propeller Platform DNA is has a little nicer features while the Propeller Platform Express is a little more simple and less expensive. As the Propeller Platform is user-driven design, you can also make your own version of the Propeller Platform from the open-source design.
Most Propeller Platforms share the same basic features. They can be powered by barrel jack, screw terminal or by USB. They have 3.3-volt and 5-volt regulators. The pin headers provide easy access to all I/O pins. Additional pin headers can be installed to create easily stackable modules. Finally, the Propeller Platforms all provide a μSD card socket.
I really like this board. It is easy to use and is useful for beginners and experts alike. It is unfortunate that Parallax does not directly support them. Although Propeller Platforms have been available at times from Parallax's website, these have always been created by third-parties.
Propeller ASC+
The Propeller ASC+ is another third-party board from the producer of the Propeller Platform DNA. It is also often available directly from Parallax. The Propeller ASC+ is unique in that although it is a Propeller, it mimics the form of the basic Arduino microcontroller. The Arduino is a microcontroller platform with similar features to the Propeller. Although the Propeller's power and multitasking abilities make it much more suitable as an experiment controller than the Arduino, the Arduino is also a very capable device that has become very popular in education and hobby electronics. Because the Arduino is so popular, many shields (removable modules) have been created for the Arduino. With the Propeller ASC+, the propeller user can take advantage of these many shields while still maintaining the greater power, greater flexibility, video generation abilities and multiple processors of the propeller. In fact, ASC stands for Arduino Shield Compatible.
In design, the Propeller ASC+ is similar to the Propeller Platform. It can be powered by a barrel jack or USB connection. Pin headers also make it easy to connect to the Propellers I/O pins although since the 32 I/O pin Propeller is now restricted to the 13 I/O form of the Arduino, some pins are not easily accessible. As the Arduino sends and receives 5-volt signals instead of 3.3-volt signals like the Propeller, the Propeller ASC+ has special circuitry to enable it to receive 5-volt signals without any risk of damaging the Propeller chip. The Propeller ASC+ also matches and exceeds the Arduino's analog input capabilities. The Arduino has 6 built-in analog input pins, the Propeller ASC+ uses a MCP3208 Analog to Digital Converter to read analog input from 6 pins in the same location, in addition reading analog input from an additional 2 pins on an auxiliary bus unique to the Propeller ASC+. Although it is very easy to use an MCP3208 A/D Converter, it is nice to have a Propeller board with the MCP3208 built right in to the board. The Propeller ASC+ also has a μSD card socket on the bottom of the board, which the Arduino lacks. It also provides both a 3.3-volt and 5-volt regulator.
Overall, the Propeller ASC+ is a great board that is very useful as an experiment controller, or as a transition from Arduino-based systems to Propeller-based systems. Although I prefer the form of the Propeller Platform as it provides easier access to all I/O pins, the Arduino ASC+ is very handy especially due to the built-in MCP3208 A/D Converter.